Background
BIND9 is an open-source DNS (Domain Name System – the text-to-ip-address resolution system we all rely upon) server application that many of the world’s DNS servers use to change IP addresses (e.g. 1.2.3.4) into strings of characters such as “questioncomputer.com”. DNS is an area of expertise in which some people spend their entire careers and as such, there is much to know about it. I’m no DNS expert, but since anyone can fire up their own DNS server with BIND9, I figured I’d give it a go. BIND9 of couse runs on Linux, today we’ll be using Ubuntu 18.04.
BIND9 is one of several applications that a non-profit company called “Internet Systems Consortium” produces, you can find their page on BIND9 here. They rely on companies that use BIND9 to purchase professional support, so if you work for an organization that does, please consider reaching out to them.
Topology

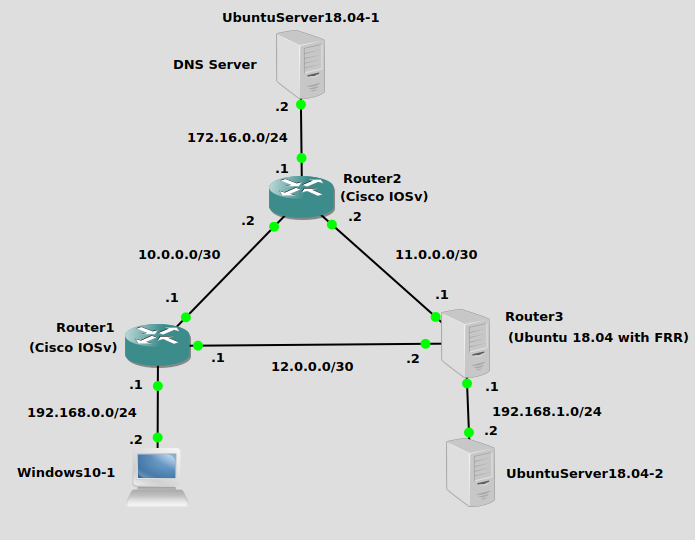
This topology includes 3 different routers and 3 different servers. The routers, aptly-named Router1, Router2, and Router3 each have 1 server connected. Two of the routers are Cisco IOSv routers, and Router3 is an Ubuntu box with Free Range Routing installed just for kicks. Routing is set up using OSPF, so everything can already ping everything else. If you’re interested in how set up an Ubuntu 18.04 server as a router with OSPF, please check out my post on installing FRR. In that post I ran EIGRP but configuring OSPF is pretty simple once you get FRR installed.
The DNS server at the top is running Ubuntu 18.04, as well as the generic Ubuntu 18.04 server at the bottom right. There is a Windows 10 desktop at the bottom left to provide some diversity.
Installation
Installation of BIND9 is pretty easy using Ubuntu’s package manager:
apt-get install bind9
Configuration
There are three text files needed to get a basic BIND9 configuration up and running, these are:
/etc/bind/named.conf.options –> Configures BIND9 options
/etc/bind/named.conf.local –> Sets zone file name and gives its location
/etc/bind/zones/db.jamesmcclay.com –> The actual zone file with DNS records.
First order of business is edit /etc/bind/named.conf.options to have a very, very basic configuration:
options {
        directory "/var/cache/bind";
        listen-on { any; };
};
Second, add a zone configuration to named.conf.local that indicates where the zone file will be kept:
zone "jamesmcclay.com" {
    type master;
    file "/etc/bind/zones/db.jamesmcclay.com";
};
Lastly, we’ll create “db.jamesmcclay.com” under the “zones” directory, because that’s what I put in named.conf.local. Obviously you’ll want to probably substitute something else for “jamesmcclay.com”:
@               IN      SOA     dns-server.jamesmcclay.com    dns-server.localhost (
                                2               ; Serial
                                604800  ; Refresh
                                86400           ; Retry
                                2419200 ; Expire
                                604800 )        ; Negative Cache TTL
;
@               IN      NS      dns-server
@               IN      A       172.16.0.2
Router1         IN      A       10.0.0.1
Router2         IN      A       10.0.0.2
Router3         IN      A       11.0.0.1
Win10           IN      A       192.168.0.2
U1804           IN      A       192.168.1.2
dns-server      IN      A       172.16.0.2
The values towards the top are mostly just setting default values for DNS, while the A records at the bottom are more important. Those are the IP addresses that will be returned for hostnames within “jamesmcclay.com”. Gotta make sure those are correct. They all correspond with the IP’s listed in the topology.
Now restart BIND9:
systemctl restart bind9
It should show green if your config is good:
$systemctl status bind9

Configuring the servers and desktops is as simple as setting the DNS server IP address to 172.16.0.2. On Ubuntu linux, you can do it with Netplan. The default config file for Netplan is at /etc/netplan/50-cloud-init.yaml, and I configured UbuntuServer18.04-2 at the bottom right of the topology like this:
network:
    ethernets:
        eth0:
            addresses: [192.168.1.2/24]
            dhcp4: false
            optional: true
            gateway4: 192.168.1.1
            nameservers:
                search: [jamesmcclay.com]
                addresses: [172.16.0.2]
    version: 2
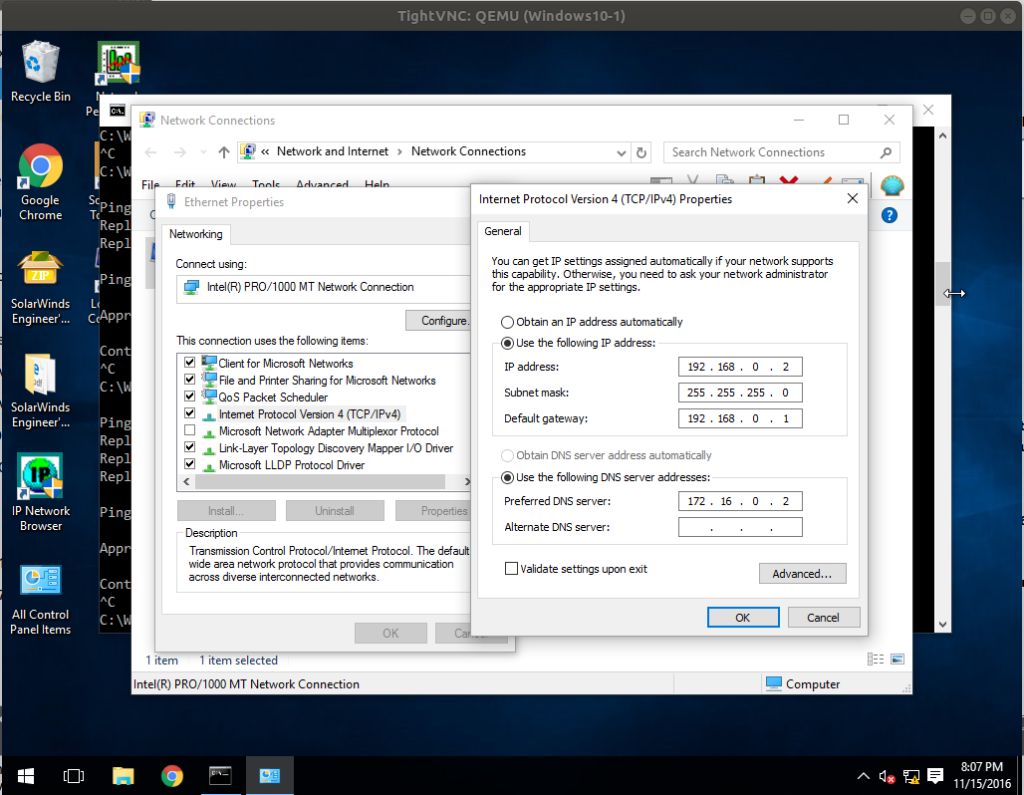
For Windows 10 (and most others, I think) you can sift through the control panel to get to network adapter settings, but I just hit “window key + R” and type “ncpa.cpl” and press enter which takes me to network adapter configuration. My configuration on the Windows 10 desktop at the bottom left of the topology looks like this:

In “Advanced” I also set the search domain to “jamesmcclay.com” which appends that domain to any non-fully qualified hosts entered. You’ll see how that’s helpful in the verification section:

Verification
Simple pings will verify that you’re able to reach various hosts via their DNS names instead of IP addresses. On the UbuntuServer18.04-2 at the bottom right, I pinged the whole group using their fully qualified domain names:
$ping router1.jamesmcclay.com -c 1
64 bytes from 10.0.0.1 (10.0.0.1): icmp_seq=1 ttl=254 time=1.45 ms
$ping router2.jamesmcclay.com -c 1
64 bytes from 10.0.0.2 (10.0.0.2): icmp_seq=1 ttl=254 time=1.03 ms
$ping router3.jamesmcclay.com -c 1
64 bytes from 11.0.0.1: icmp_seq=1 ttl=64 time=0.635 ms
$ping win10.jamesmcclay.com -c 1
64 bytes from 192.168.0.2 (192.168.0.2): icmp_seq=1 ttl=126 time=2.11 ms
$ping dns-server.jamesmcclay.com -c 1
64 bytes from 172.16.0.2 (172.16.0.2): icmp_seq=1 ttl=62 time=0.913 ms
And since I entered search domains in my DNS server configurations, I can ping hosts without fully qualified domain names. From my Windows 10 desktop:

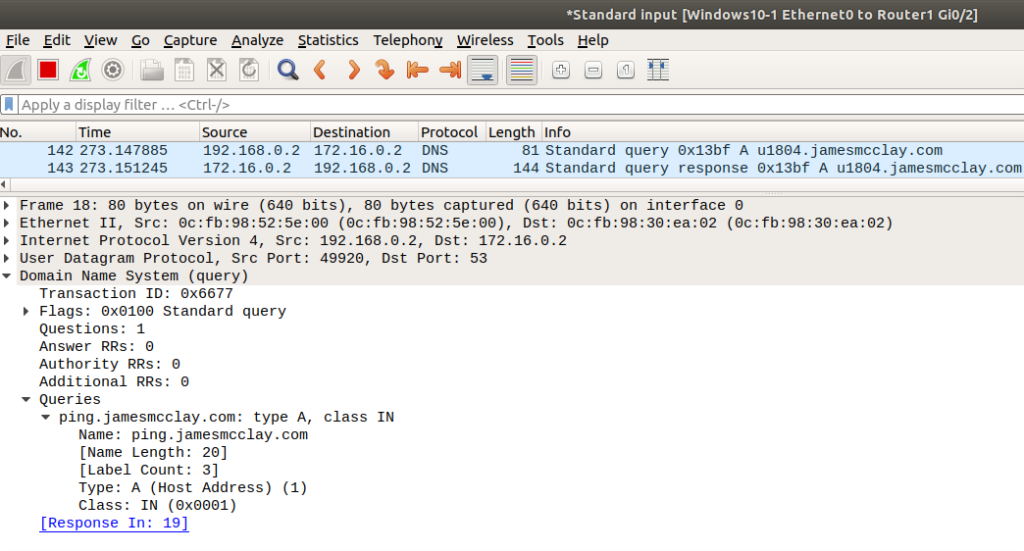
And as usual, you can do a packet capture to verify that the DNS packet flow is working correctly. If I look at packets leaving my Windows 10 desktop, I’ll see a DNS query from the desktop, and a response from BIND9:

Troubleshooting
If you’re having trouble, make sure all of your config files are formatted correctly. They get angry if you don’t format them right. Be sure and do a packet capture if you get stuck, that will pinpoint the problem pretty quickly. Also you can check the logs in the BIND9 server for messages that might have a clue. The command I use is “cat /var/log/syslog | grep bind”.
Apr 19 03:42:16 uvm1804 named[15145]: running as: named -f -u bind<br>Apr 19 03:42:16 uvm1804 named[15145]: loading configuration from '/etc/bind/named.conf'<br>Apr 19 03:42:16 uvm1804 named[15145]: reading built-in trust anchors from file '/etc/bind/bind.keys'<br>Apr 19 03:42:16 uvm1804 named[15145]: set up managed keys zone for view _default, file 'managed-keys.bind'<br>Apr 19 03:42:16 uvm1804 named[15145]: configuring command channel from '/etc/bind/rndc.key'<br>Apr 19 03:42:16 uvm1804 named[15145]: configuring command channel from '/etc/bind/rndc.key'<br>root@dns-server:/etc/netplan#

Pingback: Technology Short Take 126 - s0x