Background
IPsec is a handy tool for encryption connections on networks, but it can be a bit complicated to configure, especially when you’re dealing with multiple vendors. On Linux, the protocol that encrypts connections is built-in to the kernel, it’s called Encapsulating Security Payload. However there are many security parameters that need to be configured, so a tool is usually needed to handle the task of figuring that out. That’s where the IKE protocol comes in to handle negotiation of cryptographic keys and parameters between the two IPsec tunnel endpoints.
There are several projects that implement the IKE protocol on Linux, my personal favorite is Strongswan, due to its active development on Github and comprehensive implementation of IPsec’s features. You can check out the Strongswan website and their Github page for more information and open source code.
A “standard” IPsec tunnel usually has the two LAN subnets that the tunnel will be connecting configured into the tunnel “policy”, and is negotiated when bringing up the tunnel. Changing those subnets requires bringing down the tunnel and manually re-configuring it by hand. A solution to this is a “route-based” tunnel. instead of a policy, a logical or “virtual” interface (a network interface with no physical counterpart) exists with an IP address on it. Once the tunnel interface is up and encryption is working, you can treat it like any other interface and apply policies, shaping, routing protocols, etc. It’s like an Ethernet cable made out of math. There are two kinds (that I know of) of route-based tunneling, GRE and VTI. Today I’m going to configure GRE.
- Ubuntu 18.04 Server
Ubuntu 18.04 Server
Ubuntu Linux 18.04 makes installation of Strongswan nice and easy with its package manager:
apt-get install strongswan
This can be out of date, though. If you want a really new version of Strongswan, you can try compiling from source using Github. Ubuntu 18.04 repositories have Strongswan 5.6.2, which is pretty feature-complete.
Topology
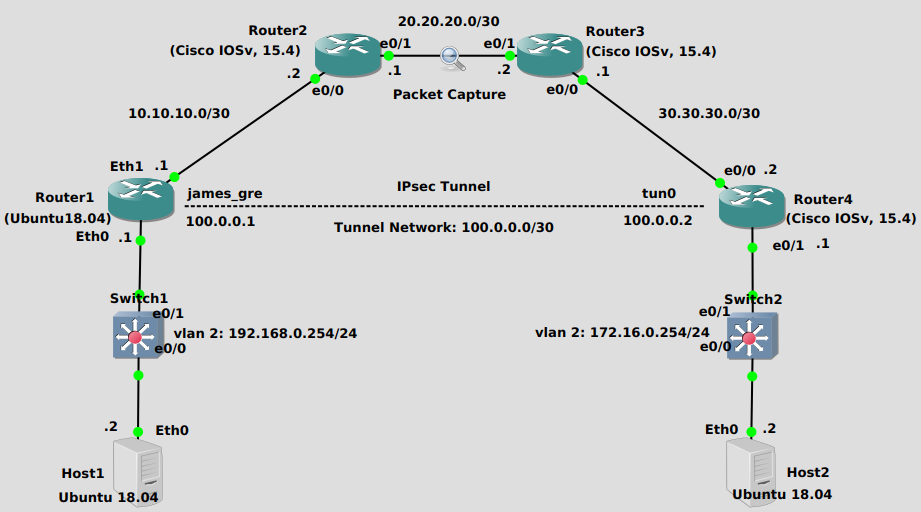
We’re trying to get Host1 (Ubuntu 18.04 Server) to be able to reach Host2 (Ubuntu 18.04 Server). You can think of the top of the topology as an Internet-like network, where the private networks that Host1 and Host2 are attached to cannot directly reach other, and wouldn’t want to even if they could since the Internet is not such a friendly place. Encryption and authentication are needed, which the IPsec tunnel provides.
Inside the tunnel there is a another set of IP-headers encapsulating packets, which is the essence of a tunnel in networking. There are virtual interfaces on either side, in this case I’ve randomly chosen 100.0.0.1/30 for the Ubuntu side and 100.0.0.2/30 for the Cisco side. The Ubuntu box has a tunnel interface name “james_gre”, while the Cisco box has an interface name of “tunnel0”.
- Router1 (Ubuntu18.04)
- Router4 (Cisco IOSv, 15.4)
Router1 (Ubuntu18.04)
The first order of business is to create a GRE virtual interface. It’s pretty straightforward on Ubuntu 18.04:
#Add the interface
ip tunnel add james_gre local 10.10.10.1 remote 30.30.30.2 mode gre

#Activate it
ip link set james_gre up

#Add an IP address
ip addr add 100.0.0.1/30 dev james_gre

#Set the MTU, to account for GRE/ESP protocol overhead
ip link set dev james_gre mtu 1440
Second, we configure Strongswan. First edit the text file /etc/ipsec.conf in you favorite text editor, I use Vim. It should look something like this:
config setup
 strictctlpolicy=yes
 uniqueids=no

conn james_tunnel
 left=10.10.10.1         #Outside interface of this router
 leftprotoport=47        #IP protocol 47 for GRE
 right=30.30.30.2        #Outside interface of the cisco router
 rightprotoport=47       #IP protocol 47 for GRE
 ike=aes256-sha2_256-modp1024! #Corresponds to cisco ikev2 proposal
 esp=aes-sha2_256!       #Corresponds to cisco transform set
 keyingtries=0
 ikelifetime=1h
 lifetime=8h
 authby=secret
 auto=start
 keyexchange=ikev2
 type=transport          #Corresponds to cisco transform set "mode"
I use transport mode for less overhead, although you can use tunnel mode if you want. Just make sure all parameters on both sides match. Notice there is no policy to specify subnets to traverse the tunnel, the routing table determines that. Hence, route-based tunnel.
Then edit the /etc/ipsec.secrets text file, it should look like this:
10.10.10.1 30.30.30.2 : PSK '12345'
Finally, restart strongswan to load your configuration.
ipsec restart
Router4 (Cisco IOSv, 15.4)
Verification
- Router1 (Ubuntu18.04)
- Router4 (Cisco IOSv, 15.4)
Router1 (Ubuntu18.04)
You can check to see the status of a particular tunnel with:
root@uvm1804:ipsec status james_tunnel

#Produces the following output:
Security Associations (1 up, 0 connecting):
james_tunnel[9]: ESTABLISHED 42 minutes ago, 10.10.10.1[10.10.10.1]...30.30.30.2[30.30.30.2]
james_tunnel{9}:  INSTALLED, TRANSPORT, reqid 6, ESP SPIs: c4f61431_i b854a518_o
james_tunnel{9}:   10.10.10.1/32[gre] === 30.30.30.2/32[gre]
The above output shows an established tunnel. Also try pinging across the tunnel, that’s always a surefire way to tell if things are working well.
Router4 (Cisco IOSv, 15.4)
Don’t forget you’ll also need to install routes, either statically or with a protocol, to get traffic other than pings across. Did I mention this is a route-based VPN?
Troubleshooting
- Router1 (Ubuntu18.04)
- Router4 (Cisco IOSv, 15.4)
Router1 (Ubuntu18.04)
My favorite command to troubleshoot Strongswan is this one:
cat /var/log/syslog | grep charon
Which produces the logs of Charon, the Strongswan IKE daemon. If there’s something wrong, you’ll probably notice it in here. The system log file is different on different Linux distributions, check yours to be sure which one.
Router4 (Cisco IOSv, 15.4)
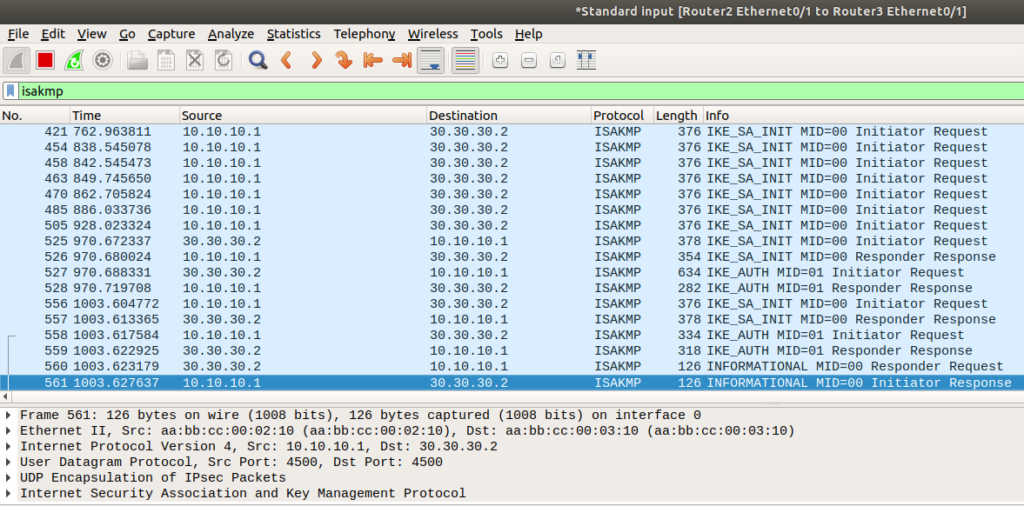
You’ll also want to do a packet capture, if possible. You’ll be looking for ISAKMP (a subset of IKE) messages attempting to establish the tunnel first:
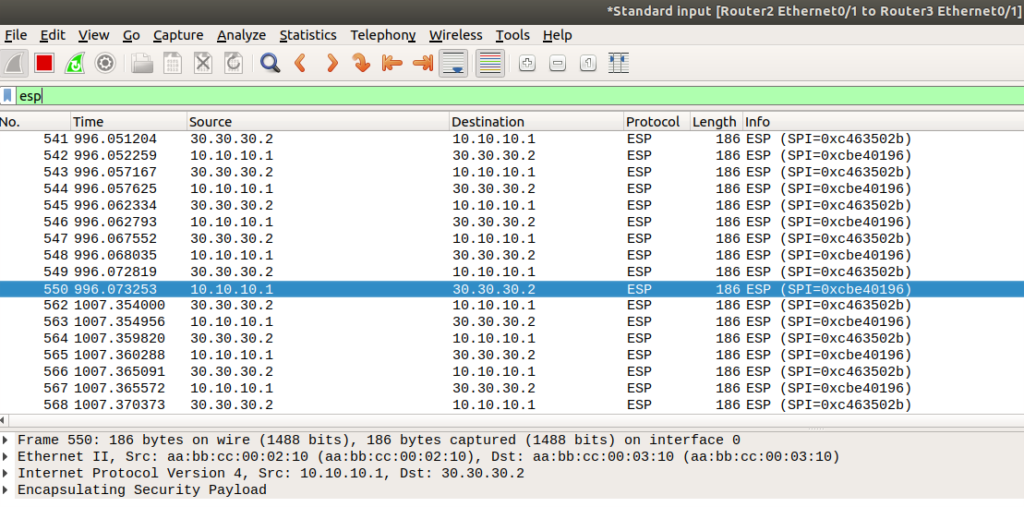
Then when the tunnel is established, you’ll only see ESP packets where data should be. If you’re seeing unencrypted, something is definitely wrong:
Hit me up if you have a question or a tunnel you’re troubleshooting. I’m happy to help.